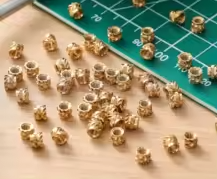
M3x5.7-OD4.6 Thread Knurled Brass Heat Set Insert Nut
Heat Resistant Embedment Nut for 3D Printer Accessories
These M3 brass threaded inserts are designed for heatset installation into 3D printed parts, creating durable, reusable metal threads in plastic components. The knurled pattern ensures a secure grip within the material, preventing rotation and pullout [citation:1][citation:4].
Creates Strong, Reusable Threads in Plastic - Prevents screw threads from stripping in 3D prints [citation:4]
Efficient Heat Transfer - Brass alloy heats quickly and melts plastic evenly for a secure bond [citation:1][citation:3]
Heat-set installation is the most common method, using a soldering iron to melt the insert into a printed hole [citation:4].
The installation temperature should be the filament's printing temperature plus 10-20°C (e.g., 200°C for PLA, 230°C for PETG) [citation:4][citation:8].
Avoid overtightening screws, as the surrounding plastic can still deform even though the brass insert is strong [citation:8].
Technical Specifications
| Parameter | Value |
|---|
| Thread Size | M3 (3mm) [citation:1] |
| Overall Length (L) | 5.7mm [citation:1][citation:3] |
| Outer Diameter (OD) | 4.6mm [citation:1][citation:3] |
| Material | Brass (high thermal conductivity) [citation:1][citation:6] |
| Knurl Type | Spiral / Opposing (Anti-spin design) [citation:1][citation:10] |
| Compatible Plastics | PLA, PETG, ABS, PC, PA, Nylon, etc. [citation:1][citation:6] |
= Key Features =
High Durability - Brass construction withstands repeated assembly/disassembly without stripping [citation:4]
Excellent Thermal Conductivity - Transfers heat quickly to melt surrounding plastic evenly [citation:3][citation:6]
AntiRotation Design Knurled pattern and serrated flange provide 360° grip to prevent spinning [citation:1][citation:10]
Precise Installation - Tapered front end aids alignment and insertion into printed holes [citation:6][citation:10]
Corrosion Resistant - Brass material resists rust and is suitable for electronics and marine use [citation:1]
= Applications =
- 3D printer motor mounts and structural parts
- Enclosures and housings requiring screw assembly
- Drone frames and RC car chassis
- CNC machined components
- Laptop and electronic device plastic shells
- Robotics joints and mechanical assemblies
Durable Finish Creates professionalquality threaded connections in plastic parts [citation:4]
Reliable Grip Opposing knurl pattern provides excellent pullout and torque resistance [citation:10][citation:13]
√ 100% Lead and Cadmium Free - Safe for environmental use and RoHS compliant [citation:4]
√ Compatible with PLA, PETG, ABS, and many other filaments [citation:3][citation:6]
√ Standard M3x0.5 thread for common machine screws
Installation Guidelines
*Preparation:*
- Drill or model hole approximately 4.0mm diameter (check manufacturer specs) [citation:5][citation:7]
- Hole depth should be insert length + 0.5mm for proper seating [citation:5][citation:8]
- Add a small chamfer at the hole opening to guide the insert [citation:8]
*Installation Steps:*
- Insert the tapered end into the prepared hole [citation:8]
- Heat soldering iron to printing temperature + 10-20°C [citation:4]
- Gently press the heated tip onto the insert, applying even vertical pressure [citation:8]
- Continue pressing until the insert is flush with the part surface [citation:8]
Practice on a test print to dial in the correct hole size and installation technique before working on your final part [citation:5][citation:8].
Troubleshooting
Insert won't sit flush:
- Ensure hole depth is sufficient (at least 6.2mm) [citation:5]
- Increase soldering iron temperature slightly
- Apply steady, even pressure while heating
Insert spins in hole:
- Check hole diameter is correct (~4.0mm) [citation:5][citation:7]
- Try a larger or more aggressive knurl pattern
- Consider printing a test piece with different hole sizes [citation:10]
Plastic bulging around insert:
- Reduce pressure during installation
- Lower installation temperature slightly
- Ensure wall thickness is adequate (minimum 1.8mm) [citation:7]